- Home
- Composting in winter
Composting in winter can reduce landfill waste while preparing fresh compost for spring
It seems like “composting in winter” -- just like all other “winter gardening”-- means different things depending on where you live.
For example there are gardeners in the northern states or southern Canada who live in zones 5 and 6 where periods of snow, ice, and freezing cold frequently alternate with periods of mild rainy weather.
These gardeners of course consider themselves to be northerners and many have blogs or videos on "northern gardening."
Those of us who live in zones 4, 3, and even 2 may get discouraged trying to follow some of their advice, but not all is lost. We too, can do some limited winter composting.
FIRST LET’S COVER THE BASICS OF COMPOSTING
The two main reasons to compost, of course, are:


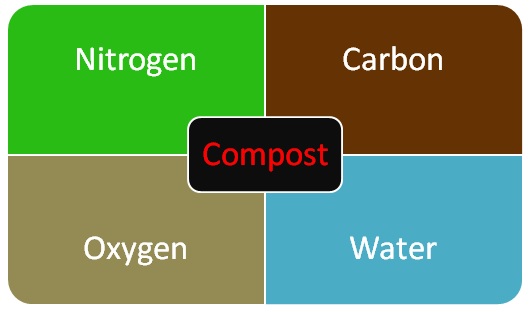
The basic concept of composting, as you may know, involves combining nitrogen, carbon, water, and oxygen to make rich organic soil.
Obviously that’s over-simplified, but really that’s what you’re doing.
Nitrogen rich materials are often referred to as greens, and carbon rich materials are called browns.
That doesn’t necessarily refer to their color. For example fresh coffee grounds and animal manures are brown in color but rich in nitrogen.
Shredded paper is not brown in color but is still rich in carbon.
Essentially, greens are materials that were recently living and are usually rather wet. Examples are grass clippings, recently cut plants, eggs shells, and of course fruit and vegetable food scraps.
When living organisms die, they begin the process of losing their nitrogen. Eventually they are completely dried out and are known as browns. Examples are hay (alfalfa hay would be an exception), straw, sawdust, paper, and autumn leaves.
Of course not all greens contain the same percentage of nitrogen and not all browns contain the same percentage of carbon.
As a general rule of thumb though, for optimum composting, you are looking for a brown to green ratio of roughly 3 to 1. So every time you add 2 inches of green material, cover it with about 6 inches of brown material.
To discourage flies, rodents, and other pests, avoid meat scraps, fats, and dairy products and always cover green material such as food scraps or fresh grass clippings with a brown layer.
Add some water to each layer. Use a pitchfork or compost turner to stir frequently, allowing oxygen into the mix.
You should aim to keep your compost heap at least 3 feet wide, 3 feet long, and 3 feet high. (One cubic metre for those of us who use metric.) Any smaller and your compost won’t have the critical mass necessary to reach ideal temperatures of 160 degrees Fahrenheit (about 70 degrees Celsius.)
If the compost smells like sewage, add more browns.
If it smells like rotten eggs, stir more to allow more oxygen.
Ideally, you will want three compost bins, one for unprocessed compost, one for partially composted, and one for finished compost.
 3 Compost Bins for three stages of development
COMPOSTING IN WINTER
As the weather turns colder, it may be necessary to adjust your composting techniques, especially if you have severe winters with extreme cold and lots of snow.

Autumn is a great time to collect lots of browns, especially if there are deciduous trees around. Leaves shredded with the lawn mower make great compost material.

As the temperature drops, the decaying process tends to slow down but that doesn’t mean you have to quit composting. If you have your green and brown materials finely chopped and well mixed, some decaying still occurs, especially on warm sunny days.
Even though not a lot of decaying may occur, the alternate freezing and thawing will help break down the materials in preparation for warm weather.

A compost tumbler or sealed garbage can work well in the winter time. The sealed container does a better job of holding in whatever heat the compost does manage to generate and also keeps out mice, squirrels, and other pests.
Keep your tumbler or garbage can close to the house so you won’t have to wade a mountain of snow every time you have food scraps to dispose of.
 Compost close to house
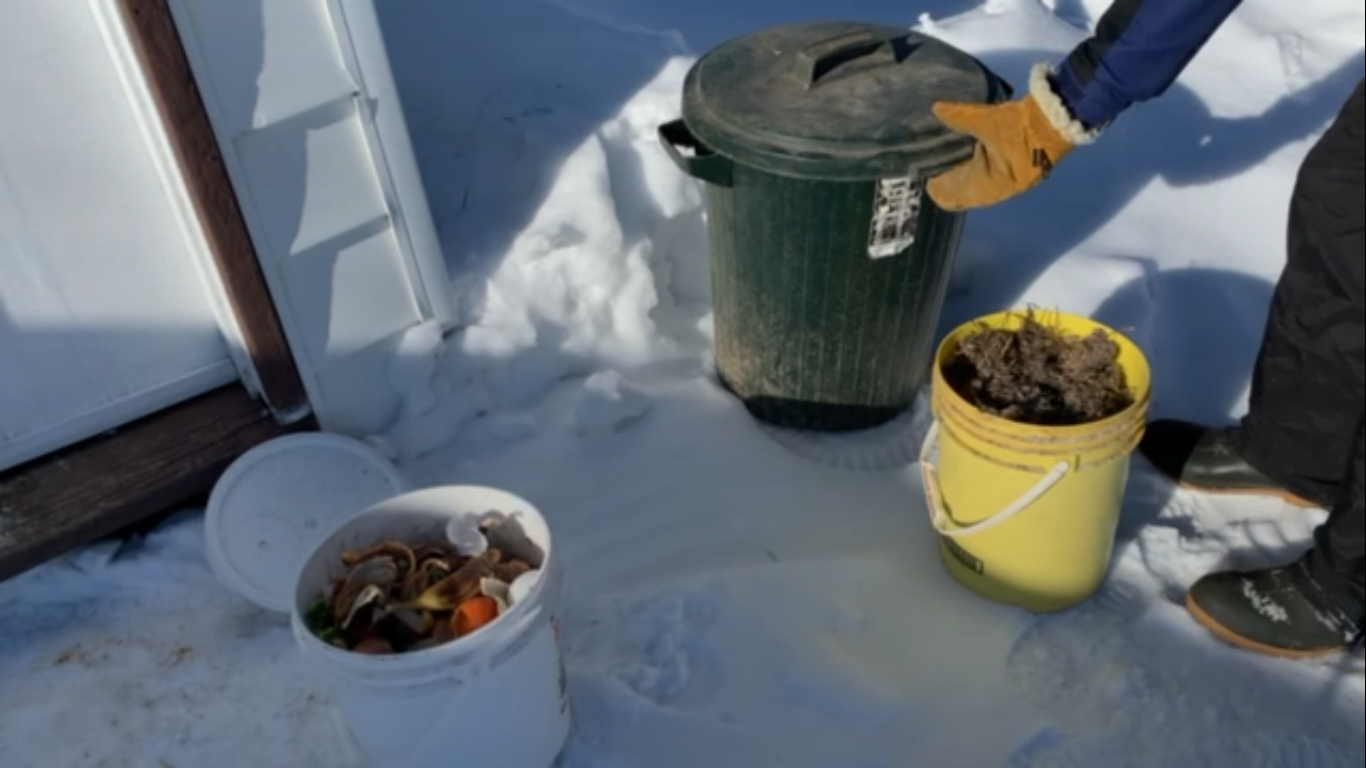
A pail with a lid in your porch or near the kitchen door will hold scraps to save you trips outside, or you can keep a large zip lock bag of food scraps in your freezer.
 Compost pail
Ideally, you will want to mix brown material in with the food scraps each time you dump them into your winter compost bin. This is possible in early winter but in Zone 3, eventually everything will tend to freeze solid. Unless you have room for a bag or two of leaves in your basement, you may have to wait until spring or at least a thaw to add brown material.
 Collecting browns for winter composting
Stirring will also be hard once things freeze solid. Again, on a warm sunny day, you may be able to turn your compost tumbler or lay your garbage can down and roll it, mixing the greens and browns and stirring in oxygen.
You definitely don’t want to add water in the winter or everything will freeze solid for sure.
Don’t get discouraged if your winter compost doesn’t seem to be decaying as quickly as it should be, or maybe not at all.
You are accumulating organic material for spring as well as keeping waste out of the landfills.
If your winters are extremely harsh, articles on winter composting written by bloggers with less severe winters may seem overly optimistic but don't give up.
For you, composting in winter may not provide a lot of finished compost, but after a looonnng cold winter, you will have lots of raw materials saved up for spring.
- Home
- Composting in winter
Sign up for Short Season Garden Tips
Our newsletter is packed with tips for vegetable gardening in any zone, but is especially designed with short season gardening in mind.
Recent Articles
-
Leverage zone 3 advantages for cool season crops by planting early
 Cold climate gardeners sometimes mistakenly think cool season crops don’t need to be planted early.
 -
Hardening plants off is essential for avoiding transplant shock
 Hardening plants, while essential for ensuring the survival of your seedlings, can be challenge if you work a full-time job.
 -
Is composting in winter feasible in cold climates like zone 3?
 Composting in winter is possible even in the cold climate of Zone 3. However “northern” is a relative term. Take all “northern advice” in context.